Guide to translate your React and JS applications
This guide explains how to install Lingui and configure your project, then shows you how to synchronize your keys and translations, and presents the syntaxes you can use in your code.
Important information:
- The Translation.io client is directly integrated into the Lingui i18n framework.
- Our GitHub repository provides a useful meta-package to simplify the Lingui installation. You can refer to the official Lingui documentation for more advanced features.
- Our meta-package is made to help you localize and translate your React and JavaScript apps using Lingui, with minimum effort.
- For Lingui v6, install @translation/lingui
- For Lingui v5, install @translation/lingui@3.0.0
- For Lingui v4, install @translation/lingui@2.0.0
Need help or have a question?
contact@translation.io
Installation
1. Install the package
Solution 1: Meta-package
Quick way to install Lingui with the correct dependencies.
# NPM
npm install @translation/lingui

# Yarn
yarn add @translation/lingui
Solution 2: Fine-Grained Install
More complex but cleaner install, with some packages in development only.
# NPM
npm install --save-dev @lingui/cli
npm install --save-dev @lingui/babel-plugin-lingui-macro
npm install @lingui/react
# Yarn
yarn add --dev @lingui/cli
yarn add --dev @lingui/babel-plugin-lingui-macro
yarn add @lingui/react
2. Add the following scripts
Add these lines to your package.json to make your life easier.
{
  "scripts": {
    "sync": "lingui extract --overwrite && lingui compile",
    "sync_and_purge": "lingui extract --overwrite --clean && lingui compile"
  }
}
3. Create a new translation project
Create your new project from the UI and select the correct source and target languages.
4. Configure your project
Copy the .linguirc configuration file that was generated for you to the
root of your application.
The configuration file looks like this:
{
  "locales": ["en", "fr", "nl", "de", "es"],
  "sourceLocale": "en",
  "catalogs": [{
    "path": "src/locales/{locale}/messages",
    "include": ["src"]
  }],
  "service": {
    "name": "TranslationIO",
    "apiKey": "abcdefghijklmnopqrstuvwxyz012345"
  }
}
Notes:
- With older Lingui versions (< 6.0), you must add the parameter
"format": "po" - For a fine-tuned config, use a
lingui.config.jsfile instead of.linguirc(see Lingui Configuration)
5. Setup your application
For React (cf. React Documentation or React Native documentation):
import { i18n } from '@lingui/core'
import { I18nProvider } from '@lingui/react'
import { messages } from './locales/en/messages' // English catalog of translations
import Inbox from './Inbox'

i18n.load('en', messages)
i18n.activate('en')

const App = () => (
  <I18nProvider i18n={i18n}>
    <Inbox />
  </I18nProvider>
)
For JavaScript (cf. documentation):
import { i18n } from '@lingui/core'
import { messages } from './locales/en/messages' // English catalog of translations

i18n.load('en', messages)
i18n.activate('en')
6. Localize your code
Localize your app using the <Trans>React syntax</Trans>
or the t`JavaScript syntax`.
7. Initialize your project
Run the following commands to push your source keys and existing translations to Translation.io:
# NPM
npm run sync

# Yarn
yarn sync
If you need to add or remove languages in the future, please read this section about that.
Usage
Sync
To send new translatable strings and get new translations from Translation.io, and at the same time generate the minified Javascript catalog files, simply run:
# NPM
npm run sync

# Yarn
yarn sync
Sync and Purge
If you need to remove unused strings from Translation.io, using
the current branch as reference, use the --clean option.
# NPM
npm run sync_and_purge

# Yarn
yarn sync_and_purge
As the name says, this operation will also perform a sync at the same time.
Warning: all strings that are not present in the current local branch will be permanently deleted from Translation.io.
Localization syntaxes
React JSX Syntax
Singular
import { Trans } from "@lingui/react/macro"
{/* Regular */}
<Trans>
  Text to be translated
</Trans>

{/* Variable Interpolation */}
<Trans>
  Hello {name}
</Trans>

{/* Comment for translators */}
<Trans comment="Acronym for Key Performance Indicator">
  View KPIs
</Trans>

{/* Simple HTML Tags: translators will see "Text with <0>HTML</0> tags" */}
<Trans>
  Text with <em>HTML</em> tags
</Trans>

{/* Complex HTML Tags: translators will see "Text with a <0>link</0>" */}
<Trans>
  Text with a
  <a href="https://google.com" target="_blank">link</a>
</Trans>

{/* Context: to help translators and allow different translations for the same source text */}
<div>
  <Trans context="romantic meeting with someone">
    Date
  </Trans>

  <Trans context="a moment in time">
    Date
  </Trans>
</div>

{/* Explicit IDs: to have more control over the structure of your localization keys */}
<div>
  <Trans id="index.header.title">
    Dashboard
  </Trans>

  <Trans id="modal.buttons.cancel">
    Cancel
  </Trans>
</div>
N.B. Attributes (comment, context, id) can be used together.
Plural
import { Plural } from "@lingui/react/macro"
{/* Regular */}
<Plural
  value={count}
  one="You've got 1 message"
  other="You've got # messages"
/>

{/* Custom plural forms */}
<Plural
  value={count}
  _0="Your inbox is empty!"
  _42="You've found the ultimate answer"
  one="You've got 1 message"
  other="You've got # messages"
/>

{/* Variable interpolation */}
<Plural
  value={count}
  one={`Hello ${name}, you've got 1 message`}
  other={`Hello ${name}, you've got # messages`}
/>

{/* HTML tags */}
<Plural
  value={count}
  one={<Trans>You've got <strong>1</strong> message</Trans>}
  other={<Trans>You've got <strong>#</strong> messages</Trans>}
/>
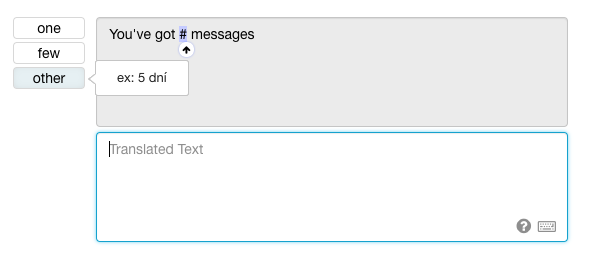
Note: English has only 2 plural forms (one and other), but other languages
have more of them, from this list: zero, one, two, few, many,
other.
On Translation.io, your translators will see the correct list of plural forms directly in the interface, with examples in their target language:
You can find the complete list of plural forms and plural rules here: available languages and plural forms
JavaScript Syntax
Singular
import { t } from "@lingui/core/macro"
// Regular
t`Text to be translated`

// Variable Interpolation
t`Hello ${name}`

// Comment for translators
t({
  comment: "Acronym for Key Performance Indicator",
  message: "View KPIs"
})

{/* Context: to help translators and allow different translations for the same source text */}
t({
  context: "romantic meeting with someone",
  message: "Date"
})

t({
  context: "a moment in time",
  message: "Date"
})

{/* Explicit IDs: to have more control over the structure of your localization keys */}
t({
  id: "index.header.title",
  message: "Dashboard"
})

t({
  id: "modal.buttons.cancel",
  message: "Cancel"
})
Plural
import { plural } from "@lingui/core/macro"
// Regular
plural(count, {
  one: "You've got 1 message",
  other: "You've got # messages"
})

// Custom plural forms
plural(count, {
  _0: "Your inbox is empty!",
  _42: "You've found the ultimate answer",
  one: "You've got 1 message",
  other: "You've got # messages"
})

// Variable interpolation
plural(count, {
  one: `Hello ${name}, you've got 1 message`,
  other: `Hello ${name}, you've got # messages`
})
Note: English has only 2 plural forms (one and other) but other languages
have more of them, from this list: zero, one, two, few, many,
other.
Translators will have the correct list of plural forms proposed directly in the interface, with examples in their target language:
You can find the complete list of plural forms and plural rules here: https://translation.io/docs/languages_with_plural_cases
Manage Languages
Add or Remove Language
You can add or remove a language by updating "locales": [] in your
.linguirc file, and syncing your project again.
If you want to add a new language with existing translations (ex. if you already have a translated PO file in your project), you will need to create a new empty project on Translation.io and init it for the first time again.
Edit Language
To edit existing languages while keeping their translations (e.g. changing from en to en-US).
- Create a new project on Translation.io with the correct languages.
- Adapt
.linguirc(new API key and languages) - Adapt the language code in the PO directory structure, and also the language header in PO files.
- Sync your project for the first time and check that everything went fine.
- Invite your collaborators in the new project.
- Remove the old project.
Since you created a new project, the translation history and tags will unfortunately be lost.
Custom Languages
Custom languages are convenient if you want to customize translations for a specific customer or another instance of your application.
A custom language is always be derived from an existing language. Its structure should be like:
`${existingLanguageCode}-${customText}`
where customText can only contain alphabetic characters and -.
Examples: en-microsoft or fr-BE-custom.
Fallbacks
Language fallbacks will work as expected for any regional or custom
language. It means that if the en-GB translation is missing,
then it will fallback to en. So you only need to translate keys that
are different from the main language when you specialize a language.
Note that fallbacks are chained, so en-US-custom will fallback to en-US that will
fallback to en.
You can find more information about Lingui fallback configuration here.
Change the current locale
You can change the current locale by using:
import { i18n } from '@lingui/core'
import { messages } from './locales/en/messages.js'

// [...]
i18n.load('en', messages)
i18n.activate('en')
You may be able to detect the default locale of the user, based on many things like navigator meta tags, HTML language tag, subdomain, path, cookie, etc.
The easiest way to do that would be to use the small
@lingui/detect-locale package.
import { detect, fromUrl, fromStorage, fromNavigator } from "@lingui/detect-locale"

// can be a function with custom logic or just a string, `detect` method will handle it
const DEFAULT_FALLBACK = () => "en"

const result = detect(
  fromUrl("lang"),
  fromStorage("lang"),
  fromNavigator(),
  DEFAULT_FALLBACK
)

console.log(result) // "en"
You will find more information about this package here
Dynamic loading of .JS translation catalogs
It’s your responsibility to load the correct translation catalog based on the active locale.
There is a clean dynamic loader helper that will assist you with this task.
// i18n.ts

import { i18n } from '@lingui/core';

export const locales = {
  en: "English",
  cs: "Česky",
};
export const defaultLocale = "en";

/**
* We do a dynamic import of just the catalog that we need
* @param locale any locale string
*/
export async function dynamicActivate(locale: string) {
  const { messages } = await import(`./locales/${locale}/messages`)
  i18n.load(locale, messages)
  i18n.activate(locale)
}
Please read more about this loader here.
Note: the documentation for this package is also available on https://github.com/translation/lingui.